Configuring Alfred Edge
Alfred Edge builds on Spring Boot. Like in Spring Boot, the configuration in Alfred Edge can be externalized, so the same application can be configured differently in different environments. Alfred Edge can be configured using properties files, YAML files, environment variables and command-line arguments.
Properties are considered in the following order, where the first found is used:
- Devtools global settings properties on your home directory (~/.spring-boot-devtools.properties when devtools is active).
- Command line arguments.
- Properties from
SPRING_APPLICATION_JSON(inline JSON embedded in an environment variable or system property). - JNDI attributes from java:comp/env.
- Java System properties (System.getProperties()).
- OS environment variables.
- Profile-specific application properties outside of your packaged jar
(
edge-{profile}.yaml oredge-{profile}.properties). - Application properties outside of your packaged jar (
edge.yaml oredge.properties). - The default Alfred Edge application properties packaged inside the
.jar in
edge.yaml.
In practice this means when running in a new environment, an edge.yaml
file can be provided outside of the edge.jar that overrides the
default settings. Environment- or profile-specific settings can be
loaded from edge-{profile}.yaml. For one-off testing, you can launch
with a specific command line switch
(e.g. java -jar edge.jar --server.address.port=8081).
Where these specific application properties files are put, is explained in the Installation Manual.
<!-- Application properties packaged inside your jar (application.properties and YAML variants). -->
<!-- @PropertySource annotations on your @Configuration classes. -->
<!-- Default properties (specified using SpringApplication.setDefaultProperties). -->
Routes
A basic functionality of Alfred Edge is routing requests to downstream services. This functionality is implemented with Spring Cloud Gateway.
The routes are completely defined in the external application configuration file.
Simple routing filter
The basic configuration routes requests unconditionally to a fixed url.
Configuration
spring:
  cloud:
    gateway:
      routes:
        - id: alfresco
          uri: http://<alfresco-host>:<alfresco-port>/
          predicates:
            - Path=/alfresco/**,/share/**
The above example configuration routes all requests starting with
/alfresco to the url http://<alfresco-host>:<alfresco-port>/alfresco
and the requests starting with /share to the url
http://<alfresco-host>:<alfresco-port>/share
Load balancing routing filter
A specific uri schema lb can be used for requests that can be
load balanced to different downstream services.
Configuration
spring:
  cloud:
    gateway:
      routes:
        - id: alfresco
          uri: lb://alfresco-service
          predicates:
            - Path=/alfresco/**,/share/**
          metadata:
            connect-timeout: 10
          filters:
            - name: Retry
              args:
                retries: 4
                backoff:
                  firstBackoff: 1ms
                  maxBackoff: 50ms
                  factor: 2
                  basedOnPreviousValue: true
The routes for the Spring Cloud Gateway are defined by the id and
get a uri with a schema lb and a service-id, used by Client
Discovery to find the actual list of servers that may receive the
requests. The lb schema is used to indicate that load balancing will
be used to address the downstream servers.
With this example configuration, all traffic to /alfresco and /share
will be routed to the alfresco-service service. The specific short
connection time and the Retryfilter are added to make sure the request
is repeated when the target service is not available. This may be the
case when there is a Service Discovery available, that has not yet
reported one target service is down. By retrying the request it will be
sent, without a considerable time out, to another service.
In order to have the service discovery, a Service Discovery implementation must be added on the runtime classpath, e.g. by adding the Edge Extension for Consul.
If the target services are fixed and no Service Discovery is available,
the target services can be hardcoded in the configuration, using the
spring.cloud.discovery.client.simple implementation:
spring:
  cloud:
    discovery:
      client:
        simple:
          instances:
            <service-id>:
              - uri: <service-id-uri-1>
              - uri: <service-id-uri-2>
              - uri: <service-id-uri-3>
Http Timeouts
Global timeouts
It is possible to define global http timeouts:
connect-timeoutin millisecondsresponse-timeoutspecified as a Duration
spring:
  cloud:
    gateway:
      httpclient:
        connect-timeout: 1000
        response-timeout: 5s
Per-route timeouts
It is possible to define global http timeouts:
connect-timeoutin millisecondsresponse-timeoutin milliseconds
To change this timeout for a specific route, add following configuration:
spring:
  cloud:
    gateway:
      routes:
      - id: per_route_timeouts
        uri: https://example.org
        predicates:
          - name: Path
            args:
              pattern: /delay/{timeout}
        metadata:
          response-timeout: 200
          connect-timeout: 200
CircuitBreaker filter
The Resilience4J allows to introduce circuit breakers and fallback URI for some routes.
spring:
  cloud:
    gateway:
      routes:
        - id: alfresco
          uri: http://<alfresco-host>:<alfresco-port>
          predicates:
            - Path=/alfresco/**,/share/**
          filters:
            - name: CircuitBreaker
              args:
                name: alfresco-broken
                fallbackUri: forward:/alfresco-fallback
        - id: alfresco-fallback
          uri: http://localhost:9994
          predicates:
            - Path=/alfresco-fallback
In the above examples, the calls to /alfresco or /share will be redirected to http://localhost:9944 when the circuit is broken.
Remark that is possible to use the CircuitBreaker filter combined with
loadbalancing and the Retry filter to guarantee maximum reliability
and performance.
Authentication
The authentication system in Alfred Edge requires requests passing through to be authenticated. Alfred Edge can act as a central authentication point in the system architecture. User identity can be securely propagated to the backend services, with a secure & signed JWT token.
Integration with a range of authentication systems is available. Currently the following authentication systems are fully supported:
- LDAP
- Active Directory (aka LDAP-AD)
- In memory user-store
- Alfresco
- Kerberos
- OpenID Connect
- Alfred Edge as a client
- Alfred Edge as a resource server
If integrating Alfred Edge with only one of these systems is not sufficient, multiple authentication protocols can be combined. Multiple instances of the same authentication protocol can also be combined, if for example your authentication architecture requires multiple LDAP-servers to be consulted.
Authentication and identity management functionality is provided by a prioritized list, or chain, of configurable authentication protocols. The built-in authentication chain is a priority-ordered list of authentication system instances.
An authentication system provides the following functionality to Alfred Edge:
- Authenticate a (web-)request, usually by veryfying user credentials
- Provide information about the users’ role or group
It is NOT possible to use Alfred Edge to authenticate CIFS or IMAP protocols.
LDAP
Overview
LDAP is often used by organizations as a central repository for user information and as an authentication service. It can also be used to store the role information for application users.
Alfred Edge uses Spring Security & Spring LDAP internally to support many different LDAP configuration scenario’s.
Using LDAP with Spring Security
LDAP authentication in Spring Security can be roughly divided into the following stages.
- Obtaining the unique LDAP “Distinguished Name”, or DN, from the
login name. There are two scenario’s supported:
- If the exact mapping of usernames to DNs is known in advance,
this can be a straight forward user-DN-pattern, such as
uid=joe,ou=users,dc=example,dc=com. - Otherwise this will mean performing a search in the directory.
- If the exact mapping of usernames to DNs is known in advance,
this can be a straight forward user-DN-pattern, such as
- Authenticating the user by “binding” as that user.
- Spring Security supports performing a remote “compare” operation of the user’s password against the password attribute in the directory entry for the DN.
- Loading the list of authorities for the user.
Configuring LDAP Authentication
These properties should be defined:
authentication.ldap.server.url: the url of the LDAP server(s).authentication.ldap.server.base: the base suffix from which all operations should origin. If a base suffix is set, you will not have to (and, indeed, must not) specify the full distinguished names in any operations performed.authentication.ldap.server.authentication: the authentication used for the connection to the LDAP server. Following values are defined:simple: the default value for plain ldap encryptionstart-tls: the authentication encryption is started with TLS.
Example:
authentication:
  ldap:
    server:
      url: ldap://<ldap-server>:<ldap-port>
      base: dc=example,dc=com
      authentication: start-tls
Using Bind Authentication
This is the most common LDAP authentication scenario.
authentication:
  ldap:
    user-dn-pattern: uid={0},ou=people
This simple example obtains the DN for the user by substituting the user login name in the supplied pattern and attempting to bind as that user with the login password. This is OK if all your users are stored under a single node in the directory.
If instead one wishes to configure an LDAP search filter to locate the user, you could use the following:
authentication:
  ldap:
    user-search-filter: (uid={0})
    user-search-base: ou=people
If used with the server definition above, this would perform a search
under the DN ou=people,dc=example,dc=com using the value of the
user-search-filter attribute as a filter. Again the user login name is
substituted for the parameter in the filter name, so it will search for
an entry with the uid attribute equal to the user name. If
user-search-base isn’t supplied, the search will be performed from the
root.
User Name
By default the user name used in Alfred Edge and for the subject claim in the JWT Token, is the user name specified by the user in the login panel. That user name, together with the supplied password is used for authentication on the LDAP server.
In special cases, however, the configuration wants another attribute of
the LDAP user definition to be used as user name and subject. This can
be done by specifying the property user-name-attribute.
authentication:
    ldap:
        user-name-attribute: cn
Loading Authorities
The LDAP repository is not only used for user authentication, but also for user authorization.
The authorization is based on the groups the user is defined in. To define the rules where the groups are searched for, following properties can be specified:
authentication:
  ldap:
    group-search-filter: uniqueMember={0}
    group-search-base: ou=groups
    group-search-tree: true
The parameter group-search-filter defines the rule that checks that a
user {0} belongs to a group.
The parameter group-search-base is the base from where groups are
searched for and the parameter groupSearchTree allows or forbids a
tree search (default value is false which forbids the tree search). In
a tree search, the groups are searched hierarchically below the search
base, else only one the level of the search base.
It is possible to map for the defined groups one or more roles. In this case, the user is granted all the roles linked to the groups the user belongs to.
authentication:
  ldap:
    group-mapping:
      - group: managers
        roles: EDGE_ADMIN
      - group: submanagers
        roles: ADMIN,TEST
      - group: developers
        roles: ACTUATOR,TEST
If no group mapping is added, the user gets roles equal to the group names of the groups he belongs to.
LDAP on Active Directory
The Microsoft Active Directory has its own authentication mechanism, that differs from the LDAP-standard.
Typically authentication is performed using the domain username (in the
form user@example.com), rather than using an LDAP distinguished name.
To make this easier Alfred Edge has explicit Active Directory
authentication support, which is a customized version of the more
generic and standardized LDAP authentication.
If the ldap-ad authentication system is properly configured, a user
can log in with its username or with his full AD principal name
(user@example.com).
Configuring LDAP-AD Authentication
The domain and url configuration parameters are required to
configure the ldap-ad authentication system.
- The domain: when a user logs on with its user name, the AD
principal name for this user will be constructed by appending the
domain. For example: if the domain property is configured to
example.comand a user will login with usernamesharon, Alfred Edge will usesharon@example.comto authenticate against AD. - The url: this specifies the ldap://-url where the Active Directory server can be accessed.
- the base-dn: (optional) this is the root for the search when locating the user-object. This parameter is optional and by default this is automatically derived from the domain.
Example configuration:
authentication:
  chain:
    - ad1:ldap-ad
  ad1:
    domain: mydomain.com
    url: ldap://<ldap-ad-host>
    base-dn: dc=example,dc=com
User name
By default the user name used in Alfred Edge and for the subject claim in the JWT Token, is the user name specified by the user in the login panel. That user name, together with the supplied password is used for authentication on the LDAP-AD server.
In special cases, however, the configuration wants another attribute of
the LDAP user definition to be used as user name and subject. This can
be done by specifying the property user-name-attribute.
authentication:
    ad1:
        ...
        user-name-attribute: sAMAccountName
Kerberos Authentication
Overview
Kerberos is a commonly used system for authentication on company networks. On Windows it is the default authentication for the Active Directory.
Configuring Kerberos Authentication
Add in the authentication chain one entry of the type kerberos. Due to system wide settings, only one kerberos authentication definition at a time can be set up.
authentication:
  chain:
    - kerberosAD:kerberos

  kerberosAD:
    debug: false
    krb5-location: <path-to-krb5-config>
When debug is set, the kerberos module logs its complete debug information. Switch it off for production systems.
For the configuration of the kerberos, the location of a kerberos file is specified.
This file is read by the kerberos module itself, and in mixed environments its name must be readable on both windows and *nix systems, so use “\” as path delimiter.
This kerberos configuration file is described in here.
In our setup, the name of the kdc and admin servers for the realm
are specified:
[realms]
EXAMPLE.COM = {
    kdc = <ldap-ad-host>
    admin_server = <ldap-ad-host>
}
If needed, the standard UDP protocol used for communication with the kerberos servers, can be replaced by TCP when setting this parameter:
[libdefaults]
...
udp_preference_limit = 1
This may be necessary when network configuration does not allow the UDP connection.
Kerberos with Single Sign On
When the kerberos is not only used for plain authentication, but also with single sign on, the name of the service principal and the path to the keytab file are specified.
  kerberosAD:
    debug: false
    krb5-location: <path-to-krb5-config>
    key-tab-location: <path-to-krb5-keytab>
    service-principal: HTTP/<service-principal-edge>@EXAMPLE.COM
    single-sign-on-enabled: true
The keytab file is generated on the kerberos server and contains the key for the service principal. The service principal is specific for the server Alfred Edge is running on.
Service principal is created on the kerberos server, following e.g. this scenario.
Client Configuration for Single Sign On
The browsers, used by the customers to access the application, must be configured to enable single sign on. This link describes how to do it.
Kerberos with Authorization Provider
It is possible to use the Kerberos with an LDAP authorization provier to retrieve the authorities for the user that connects to Alfred Edge.
For other authentication methods, retrieving the user authorities, thus the permissions the user has to perform some actions, are retrieved at once from that authentication provider.
For Kerberos, only the authentication is done, thus verifying the user and its specified password. To retrieve the permissions the user has to perform some actions, an authorization provider is used. This provider gets the roles of the user by reading this information from a database. Currently only one type of authorization provider is defined, i.e. a provider that gets the information from an LDAP repository.
When a user is logged in, the authentication module retrieves the groups the user belongs to via an LDAP request to the Active Directory. To specifiy the parameters for this LDAP connection, an LDAP user and an LDAP-AD block of properties need to be defined. The definition of these authorization providers is found in a next chapter. In the Kerberos definition in the authentication chain, the name of the authorization provider (aka user details provider) is specified.
  kerberosAD:
    debug: false
    krb5-location: <path-to-krb5-config>
    key-tab-location: <path-to-krb5-keytab>
    service-principal: HTTP/<service-principal-edge>@EXAMPLE.COM
    single-sign-on-enabled: true
    user-details-provider : <name-of-the provider>
Creating keytab files on Windows
The creation of service principal and its keytab file on Windows Kerberos AD is explained in this Alfresco Document.
$ ktpass -princ <service-principal>@<realm> -pass <password>
              -mapuser <domain>\<windows user>
              -crypto all
              -ptype KRB5_NT_PRINCIPAL
              -out keytab_sp.keytab -kvno 0

$ setspn -A <servicePrincipal> <windows user>

$ ktpass -princ <ldapUser>@<realm> -pass <password>
              -crypto all
              -ptype KRB5_NT_PRINCIPAL
              -out keytab_sp_ldap.keytab
              -in svc_keytab_sp.keytab -kvno 0
(in the snippet the line is split into multiple lines to make it completely visible)
In Memory User Authentication
The “In Memory User Authentication” is an internal authentication system, which makes it possible to authentication against a preconfigured user registry.
This authentication system is primarily intended for testing purposes.
Configuring In Memory Authentication
The in memory user authentication configuration will be explained based on following example configuration.
authentication:
  chain:
    - mem1:mem
    - mem2:mem
  mem1:
    encoder:
      type: bcrypt
    default-roles: USER, INFLOW_ADMIN
    users:
      - id: user-1
        password: $2a$10$qWbu.Kt1wiQNTRkQeAebzul1osGIA27zBjXQHOcn4Hslg/xe2nqNu
        roles: ADMIN
  mem2:
    encoder:
      type: plaintext
    default-roles: USER, INFLOW_ADMIN
    users:
      - id: user-2
        password: password
        roles: ADMIN
Enabling the in memory user authentication
To enable the in memory user authentication, we need to add an
authentication of type mem to the authentication chain.
Encoder
The encoder type specifies which encoder is used to encrypt the password of the users.
Supported encoder types:
- bcrypt (default)
- plaintext
If no encoder configuration is specified, the default encoder (bcrypt)
will be used.
DefaultRoles
This configuration specifies the default roles that are applicable for all users of this in memory user registry.
Users
Specify all the users of this in memory registry. Each user has an id and a password that should be encrypted according to the configured encoder. Additionally a user can have roles.
Alfresco Authentication
This authentication system delegates the authentication to an existing Alfresco system.
The intended use case is to support the migration from an existing Alfresco system to Alfred Edge, where the user-database is managed in Alfresco.
Working Principles
When a user provides credentials in the request to Alfred Edge, this
authentication system will use those credentials to request an
authentication token (alf_ticket) from Alfresco. If Alfred Edge is
able to get an authentication ticket, the user is considered
authenticated in Alfred Edge.
This authentication system uses the /service/api/login endpoint to
verify the credentials and request and authentication ticket.
Configuring Alfresco Authentication
In edge.yaml in Alfred Edge:
authentication:
  chain:
    - alfresco1:alfresco
  alfresco1:
    server: http://<alfresco-host>:<alfresco-port>/alfresco
To configure the Alfresco authentication:
- Create an Alfresco configuration block (
alfresco1in the example).
The only thing that needs to be configured is the server. The value is the url of the Alfresco server that should be used for the authentication. This server url should end with/alfresco. - Add the Alfresco authentication to the authentication chain.
Note: to make this authentication schema to work properly, the
authentication.chain in Alfresco needs to be configured with at least
one other (username/password-based) authentication subsystems.
For example (in alfresco-global.properties):
authentication.chain=external-jwt:external,alfrescoNtlm1:alfrescoNtlm
OpenID Connect
Alfred Edge supports also user authentication based on OpenID Connect, a standard built on top of OAuth2 authentication. In this case, the user gets a login page from the OpenID Connect Server, where he is authenticated and Alfred Edge receives JWT tokens from that OpenID Connect Server, identifying the user.
This authentication can be used in combination with the other authentication methods described before. In this case, the standard login panel gets extra buttons to forward the user to the login page of the OIDC Client he wants to use.
The configuration file defines the different OAuth2 systems where the user is allowed to log in. If one or more OAuth2 providers are specified, Alfred Edge shows a login page with additional buttons that links to the login pages of the OAuth2 systems.
The configuration of these systems is described in the Spring Security
An example to clarify this:
spring:
  security:
    oauth2:
      client:
        registration:
          <reg-1>:
            client-id: <client-id-1>
            client-secret: <client-secret>
            scope: openid, email
          <reg-2>:
            client-name: <client-name>
            client-id: <client-id-2>
            client-secret: <client-secret-2>
            scope: openid, profile, email, address, phone
        provider:
          <reg-2>:
            issuer-uri: <issuer-uri>
            user-name-attribute: email
In the above example two OAuth2 Systems are defined to log in against. The first one (with “reg-1”) is a well-known system, where there is no need to specify the different URLs. The second registration (with “reg-2”) is a custom system, and the issuer URI has to be specified.
The above example shows that it is possible to specify:
- client-id: id, received from the OpenID Connect Provider, when the application is registered in their system
- client-secret: a secret between the OpenID Connect Provider and Alfred Edge to encrypt the messages between the provider and the Alfred Edge.
- client-name: the name of the OpenID Connect Service, that will be displayed on the Alfred Edge login screen.
- scope: defines how much information on the user is sent to Alfred Edge
- user-name-attribute: specify which attribute, provided by the OpenID Connect Service, is used as authentication name (AKA username or userId) sent to the downstream applications.
Login Panel
If only OIDC Authentication is used with only one client registration for interactive users, it is possible to replace the default login panel, by the specific login endpoint of the OIDC Client:
websecurity:
  login: /oauth2/authorization/<client-id>
Specific Login
It is possible to redirect the specific user-agent to a specific login endpoints, when an authentication is needed.
websecurity:
  login: /oauth2/authorization/<client-id-1>
  specific-logins:
     <user-agent>: /oauth2/authorization/<client-id-2>
In the above example, the user-agent (e.g. the web browser) is
redirected to the login endpoint of client 1, except if the user-agent
header contains the label <user-agent>{=html}, where the user-agent is
redirected to the login endpoint of client 2.
Authentication for Alfred Desktop is a typical use case, a complete example:
spring:
  security:
    oauth2:
      client:
        registration:
          alfreddesktop:
            provider: azure-ad
            client-name: Azure for Alfred Desktop
            client-id: xxxxx
            client-secret: xxxxx
            scope:
              - openid
              - profile
              - email
              - api://xxxx/yyyyy
            redirect-uri: http://localhost:9999/login/oauth2/code/alfreddesktop
          azure:
            provider: azure-ad
            client-name: Azure
            client-id: xxxxx
            client-secret: xxxxx
            scope:
              - openid
              - profile
              - email
              - api://xxxx/yyyyy
        provider:
          azure-ad:
            issuer-uri: https://login.microsoftonline.com/xxxxx/v2.0
            user-info-uri: ""

websecurity:
  login: /oauth2/authorization/azure
  specific-logins:
    AlfredDesktop: /oauth2/authorization/alfreddesktop
  logout: /logout
Customization
There are two possibilities to customize the creation of users, authenticated by OAuth2 / OpenID:
- username: specify a string containing literals and one or more user attributes to compose the user name;
- attributes: if the user info, provided by the UserInfo Provider, has not the standard format, one can specify which element of the user info map contains the real user attributes.
Remark If the second option is used, use this key also for the default user-name-attribute!
Username
It is possible to compose the username by specifying a format string,
containing literal text and one or more attributes from the user
attributes, provided by the user info. Attributes must be surrounded by
$[ and ].
To make the program run correctly, also the standard
user-name-attribute must be specified, to allow the standard
authentication procedure run first and then the custom behaviour is
applied.
An example to clarify this:
spring
  security:
    oauth2:
      client:
        registration:
          <reg>:
            provider: <provider>
            client-name: <client-name>
            client-id: <client-id>
            client-secret: <client-secret>
            scope: <scope>
            authorization-grant-type: authorization_code
            redirect-uri: http://<host>/login/oauth2/code/<reg>
        provider:
          <reg>:
            user-name-attribute: <attr>
            token-uri: <token-uri>
            user-info-uri: <user-info-uri>
            authorization-uri: <authorization-uri>
            custom:
              user-name-attribute: $[<attr-1>] $[<attr-2>]
Attributes
Some UserInfo providers have a user info record, that contains the user attributes on a second level in the map. With this option, this map can be put in the user definition, instead of the top level map.
An example to clarify this:
spring:
  security:
    oauth2:
      client:
        registration:
          <reg>:
            provider: <provider>
            client-name: <client-name>
            client-id: <client-id>
            client-secret: <client-secret>
            scope: <scope>
            authorization-grant-type: authorization_code
            redirect-uri: http://<host>/login/oauth2/code/<reg>
        provider:
          <reg>:
            user-name-attribute: <user-attributes-key>
            token-uri: <token-uri>
            user-info-uri: <user-info-uri>
            authorization-uri: <authorization-uri>
            custom:
              attributes: <user-attributes-key>
              user-name-attribute: $[<attr>]
OIDC Resource Server
Alfred Edge can also be declared as a resource server for
OIDC/OAuth2. This means that it will accept valid JWT Access tokens as
authentication tokens. The use case for this is have Alfred Edge as a
gateway in front of one or more resource servers and Alfred Edge will
pass the JWT Access Token, as provided by the OIDC/OAuth2 Authorization
server, to the down stream services.
The configuration is :
spring:
  security:
    oauth2:
      resourceserver:
        jwt:
          issuer-uri: <issuer-uri>
          user-name-attribute:  <username-claim>
where the user-name-attribute specifies the claim in the token, used a
username in Alfred Edge.
Authorization
In order to define the user details providers (aka the authorization providers), that retrieve the permissions a user has, the configuration file for Alfred Edge contains an ‘authorization section’ with the defined providers, and for each provider its configuration.
User Details Providers
Since user details providers can be built on different types of
database, its type is defined in the list of providers, and the
configuration of the these providers can differ for the different types.
Currently, only one type of providers is defined, i.e. ldap.
authorization:
    providers:
        - <name>:<type>
        - <name>:<type>
Ldap User Details Providers
The first (and only) type of user detailed providers is ldap, to
retrieve the user details from an LDAP repository. The same type can be
used for plain LDAP and for LDAP on Active Diretory for MicroSoft
repositories.
  <name>:
    bind-user: <DN for the user, on which behalf the LDAP connection is set up>
    bind-password: <password>
    url: <url of the LDAP repository>
    authentication: <simple | start-tls>
    base-dn: <base DN for the users in the ldap repository>
    user-search-base: <search base for users in ldap repository>
    user-search-filter: <user search filter>
    user-name-attribute: <optional: attribute used as username>
    group-search-base: <search base for groups in ldap repository>
    group-search-filter: <group search filter>
    group-search-tree: <true | false>
    group-mapping:
      - group: <group name>
        roles: <list of roles for members of given group>
      - group: <group name>
        roles: <list of roles for members of given group>
Following properties can be set to configure the LDAP user details provider:
- bind-user: distinguished name of the user on which behalf the connection to the LDAP Repository is made;
- bind-password: password of that user;
- url: url of the LDAP repository. Is a comma separated list of urls to the LDAP repository;
- authentication: the authentication method used to the LDAP
repository. Can be
simple, the default value orstart-tlsfor authetication that starts with TLS; - base-dn: the base for the distinguished names in the repository;
- user-search-base: search base to find the users in the repository;
- user-search-filter: filter to search users with;
- user-name-attribute: optional property. If specified, the value of the named attribute is used internally as user name and subject in the JWT Token.
- group-search-base: search base to find the groups in the repository;
- group-search-filter: filter to search groups a user belongs to;
- group-search-tree: true (default value) if hierarchical search in tree of groups is allowed
- group-role-attribute: the attribute of the groups distinguished
name that is used as authority. Default value is
cn;
An example to make it clear:
  ldap-extern:
    bind-user: uid=admin,ou=system
    bind-password: ****
    url: ldap://<ldap-server>:<ldap-port>/
    base-dn: dc=example,dc=com
    user-search-base: ou=people
    user-search-filter: (uid={0})
    group-search-base: ou=groups
    group-search-filter: (&(objectClass=groupOfUniqueNames)(uniqueMember={0}))
    group-mapping:
      - group: managers
        roles: USER, ADMIN, ACTUATOR
      - group: developers
        roles: USER, EDGE_ADMIN, ACTUATOR
JWT Configuration
Alfred Edge passes the authenticated user and some other information via a JWT Token to the downstream servers.
It is possible to define one or more JWT configurations. For each route one can define which JWT configuration applies, or it is possible to define one configuration for all routes.
The examples below show the different settings for the JWT Configuration:
filter:
  jwt:
    - specifications:
        secret: <shared-secret>
This simple example above defines one configuration with a shared secret used for the HS256 Algorithm (the default algorithm).
filter:
  jwt:
    keystore:
      path: <path to keystore>
      password: <keystore password>
    specifications:
      - id: <id>
        algorithm: <algorithm>
        alias: <alias>
        expiration: <expiration>
      - id: <id>
        algorithm: <algorithm>
        alias: <alias>
        expiration: <expiration>
This more complex shows a configuration using a keystore file to store
shared secrets and/or public/private key pairs, identified by the
alias. Shared secrets are used by symmetric validation algorithms
(e.g. HS256), while public/private keys are used for asymmetric
algorithms (e.g. RS256). All aliases must have the same password in the
key store (this is always so for PKCS12 keystores, but should also apply
for JKS key stores).
It is possible to use shared secret (with the secret property) and
secrets from a key store in the configuration.
The expiration specified in seconds is used to set the expiration date
time on the token, default value is 5.
If only one specification is configured, the id is optional.
The id is used to reference the JWT configuration when the
JWTHeader Filter is specified for routes.
JWTHeader Filter
To define which JWT configuration to use for the routes, the ‘JWTHeader’ filter must be defined.
The filter can take up to 2 optional arguments:
- jwt-specification: the id of the applied jwt specification
- subject: this optional argument can be used to pass another subject (= user name) that the authentication user in Edge.
The specification of a fixed subject should be used with caution. It allows the use of a technical user for the downstream service, but should only be used for routes allowed to users with specific roles.
This example defines one JWT configuration with a shared secret and algorithm HS256, used for all downstream services.
filter:
  jwt:
    - specifications:
      secret: <shared-secret>
spring:
  cloud:
    gateway:
    default-filters:
      - JWTHeader
    routes:
      - id: <route-1>
        uri: <uri-1>
        predicates:
          - Path=/<path-1>
        filters:
          - RewritePath=/<path-1>,...
      - id: <route-2>
        uri: <uri-2>
        predicates:
          - Path=/<path-2>
        filters:
          - RewritePath=/<path-2>,...
This example shows a configuration with 2 JWT configurations, with
keys/secrets from a keystore. The first configuration is used for
route-1, the second for route-2 and route-3. Remark that for
route-3 not the authenticated user is passed in the token, but a fixed
user.
filter:
  jwt:
    keystore:
      path: <path to keystore>
      password: <keystore password>
    specifications:
      - id: <jwt-1>
        algorithm: <algorithm>
        alias: <alias>
        expiration: <expiration>
      - id: <jwt-2>
        algorithm: <algorithm>
        alias: <alias>
        expiration: <expiration>
spring:
  cloud:
    gateway:
    routes:
      - id: <route-1>
        uri: <uri-1>
        predicates:
          - Path=/<path-1>
        filters:
          - RewritePath=/<path-1>,...
          - JWTHeader=<jwt-1>
      - id: <route-2>
        uri: <uri-2>
        predicates:
          - Path=/<path-2>
        filters:
          - RewritePath=/<path-2>,...
          - JWTHeader=<jwt-2>
      - id: <route-3>
        uri: <uri-3>
        predicates:
          - Path=/<path-3>
        filters:
          - RewritePath=/<path-3>,...
          - JWTHeader=<jwt-2>,<fixed-user>
Jwt Access Tokens
It is also possible, when only OIDC is used as authentication, to pass
the OIDC/OAuth2 JWT Access token to the downstream services. To
configure this use case, apply the TokenRelay filter on the route(s)
Example that uses the OIDC Access token to all downstream services.
spring:
  cloud:
    gateway:
      default-filters:
        - TokenRelay
Security & Authorization
Path Authorization
Alfred Edge can be configured to require authorization to access certain paths. Only users that are granted a specified authorization role will be able to access this path.
To specify the authorization required for a user to request an URL via the Edge API Gateway, following parameters can be added to the configuration:
websecurity:
  login:  /login
  requests:
    - paths: /login, /error, /images/**, /css/**, /fonts/**
      authorization: PERMIT_ALL
    - paths: /zipkin/**
      authorization: ROLE
      roles: EDGE_ADMIN
    - paths: /invoices/**
      method: POST
      authorization: ROLE
      roles: INVOICE_ADMIN
    - paths: /alfresco/**
      query-parameters: alf_ticket
      authorization: PERMIT_ALL
The property websecurity.login specifies the path of the Login screen.
The value /login is the default value.
For the other requests, one can specify the matching URLs and the needed authorization.
URL specification
The URLs are specified by a pattern they match, and optionally can be restricted to a given method and/or the presence of one or more query parameters.
Paths are specified by Ant-style patterns:
?matches one character\*matches zero or more characters**matches zero or more directories in a path.
Remark that patterns ending with /** are optimized to be checked with
a substring.
The optional method is defined as GET, POST, DELETE, PUT, …
The optional query-parameters define a list of query parameters that
must be present in the request to match the specification.
The requests are checked in the given order. For the requests that are not matched, the user needs to be fully authenticated.
If no requests at all are configured, then the default paths for login, error, images and fonts are permitted for all. Also all other requests need a fully authenticated user.
The defined authorizations are:
PERMIT_ALLthe paths can be accessed without any authorizationDENY_ALLthe paths are forbidden for allROLEthe user needs the role specified in theROLESproperty.AUTHORITYthe user needs an authority from the given list of authoritiesAUTHENICATEDthe user needs to be authenticated to access the paths.
Security Headers
The WebSecurity on the classpath of Alfred Edge will put its default security headers in the responses from the downstream services. See Spring Security
Cache-Control: no-cache, no-store, max-age=0, must-revalidate
Pragma: no-cache
Expires: 0
X-Content-Type-Options: nosniff
Strict-Transport-Security: max-age=31536000 ; includeSubDomains
X-Frame-Options: DENY
X-XSS-Protection: 1; mode=block
The external configuration of Edge allows to change this behaviour.
To complete or change the headers returned by the downstream services, following options exist:
websecurity:
  headers:
     frame-options: DISABLE
     content-security-policy: frame-ancestors 'self'
     cache-control-enabled: true
     x-xss-protection: DISABLED
The option frame-options specifies the X-Frame-Options header.
Allowed values are
DISABLE: disable the generation of the header,DENY: specify the valueDENYfor the header, denying the page displayed in a frame,SAME_ORIGIN: specify the valueSAMEORIGINfor the header, allowing to display it in a frame on the same origin as the page itself.
The option content-security-policy specifies the value for header
Content-Security-Policy.
The option cache-control-enabled specifies the
Cache-Control
header.
Allowed values are false and true.
The option x-xss-protection specifies the
X-XSS-Protection
header.
Allowed values are
ENABLED: enable the XSS Filtering,DISABLED: disable the XSS filtering,
Access Logs
The access logs show the processed requests. The content and the format of this logging can be configured.
Configuration
Zipkin Logging
In order to check the correct behaviour of the Alfred Edge server and the servers behind this API Gateway, a centralized logging system is setup. It can be used the visualize the parts of the complete system causing some latency, discover the dependencies in the system, …
In order to collect this information, a Zipkin server must be installed and the Alfred Edge API Gateway and other servers must send their information to it.
The collected information can be inspected by the Web UI defined on the Zipkin server.
Configuration
In the Alfred Edge property file, the target Zipkin server must be defined and the collection of data must be enabled.
The collection of data is enabled by 2 components:
- Sleuth: Adds the necessary header id in the requests to link the logging from the different servers together,
- Zipkin: Creates and sends the
spanswhich allows the Zipkin server to due the latency analysis
To enable both components, following properties are added:
spring:
  zipkin:
    baseUrl: http://<zipkin-host>:<zipkin-port>
    enabled: true
  sleuth:
    sampler:
      percentage: 0.1 # 10% of messages sampled
    enabled: true
For the Zipkin server the url of the server is specified. To disable the
zipkin collection of spans the spring.zipkin.enabled flag must be set
false.
For the Sleuth component, the percentage of sampled messages can be
specified. 1.0 means 100% and 0.1 is the default value. To disable the
Sleuth component the spring.sleuth.enabled flag must be set false.
To let the users access the Zipkin Server for making their analysis, a route is specified in Alfred Edge. This allows the users to access these data via the Edge API Gateway.
spring:
  cloud:
     gateway:
       routes:
       ...
       - id: zipkin
         uri: http://<zipkin-host>:<zipkin-port>
         predicates:
            - Path=/zipkin/**
General Spring Configuration
Since Alfred Edge is a Spring application, a lot of general Spring configuration settings are applicable.
Logging
Alfred Edge uses the Spring Boot logging with the default LogBack configuration.
Pattern
It is possible to specify the pattern used for the logged messages.
To log the user in the logging, an attribute with name user is
available. It can be logged with the span info from Sleuth by specifying
this:
logging:
  pattern:
    level: "%5p [${spring.application.name:},%X{traceId},%X{spanId},%X{spanExportable}] %X{user}"
In the above example the default tracing of the level is replaced by:
- the log level,
- the sleuth information, enclosed by square brackets,
- the user, if available.
Remark that this direct specification is only applicable if the default logback setup is used (see Custom Log Configuration).
Level
It is possible to increase or decrease the logging level of the software packages used.
This can be done by specifying properties in the yaml file, having the
name logging.level.<package> and a value from this list, specifying
them from a lot of logging to as little as possible logging
TRACE,DEBUG,INFO,WARN,ERROR,FATAL.
A few examples to show the possibilities:
logging.level.org.springframework.security: INFO
logging.level.eu.xenit.alfred.edge: ERROR
logging.level.eu.xenit.alfred.edge.filters.pre: WARN
or
logging.level:
  org.springframework:
      security: WARN
      security.ldap: DEBUG
      security.ldap.userdetails: INFO
      security.kerberos.authentication: TRACE
  eu.xenit.alfred:
        edge: ERROR
        edge.security: DEBUG
        edge.filters.pre: WARN
        edge.jwt.claims.provider: INFO
Specific Logback settings
For more specific logging, it is possible to add a LogBack configuration file.
The name of this specification file must be defined in the edge.yml:
logging:
  config: <path to the logback configuration file>
The logback configuration file can use properties that are specified in the edge.yml file.
The logback configuration can be used to:
- specify logging to console, a log file and/or an access log file
- specify the pattern used
- specify the files where logging is written to
- specify a rolling policy for files (switch to new file after a given time and/or size)
- specify how logging is done (text, json)
An example of such a configuration file:
<?xml version="1.0" encoding="UTF-8"?>
<configuration>
    <!-- properties from the edge.yml configuration file -->
    <springProperty scope="context" name="logFile" source="logging.file"
            defaultValue="/logs/edge.log"/>
    <springProperty scope="context" name="consoleLogPattern" source="logging.pattern.console"
            defaultValue="%5level %X{user} ${PID:- } --- [%thread] %-40.40logger{39} - %msg%n"/>
    <springProperty scope="context" name="fileLogPattern" source="logging.pattern.file"
            defaultValue="%d{yyyy-MM-dd HH:mm:ss.SSSXXX } %5level [${spring.application.name:},%X{traceId},%X{spanId},%X{spanExportable}] %X{user} ${PID:- } --- [%thread] %-40.40logger{39} - %msg%n"/>
    <springProperty scope="context" name="accessLogFile" source="logging.access-log"
            defaultValue="/logs/access_log.log"/>
    <springProperty scope="context" name="rollingFileNamePattern" source="logging.rolling-filename-pattern"
            defaultValue="/logs/access_log.%d{yyyy-MM-dd}.log"/><br />    <!-- access log definition -->
    <appender class="ch.qos.logback.core.rolling.RollingFileAppender" name="accessLog">
        <file>${accessLogFile}</file>
        <encoder>
            <pattern>%msg%n</pattern>
        </encoder>
        <rollingPolicy class="ch.qos.logback.core.rolling.TimeBasedRollingPolicy">
            <!-- daily rollover -->
            <fileNamePattern>${rollingFileNamePattern}</fileNamePattern>
            <!-- keep 30 days' worth of history capped at 3GB total size -->
            <maxHistory>30</maxHistory>
            <totalSizeCap>3GB</totalSizeCap>
        </rollingPolicy>
    </appender>

    <appender class="ch.qos.logback.classic.AsyncAppender" name="async">
        <appender-ref ref="accessLog"/>
    </appender>

    <!-- logging on console -->
    <appender name="CONSOLE" class="ch.qos.logback.core.ConsoleAppender">
        <encoder>
            <pattern>${consoleLogPattern}</pattern>
        </encoder>
    </appender>

    <!-- logging in a rolling log file -->
    <appender name="FILE"
            class="ch.qos.logback.core.rolling.RollingFileAppender">
        <encoder>
            <pattern>${fileLogPattern}</pattern>
        </encoder>
        <file>${logFile}</file>
        <rollingPolicy class="ch.qos.logback.core.rolling.SizeAndTimeBasedRollingPolicy">
            <fileNamePattern>${logFile}.%d{yyyy-MM-dd}.%i.gz</fileNamePattern>
            <maxFileSize>10MB</maxFileSize>
            <maxHistory>0</maxHistory>
        </rollingPolicy>
    </appender>

    <!-- logger for the access log -->
    <logger additivity="false" level="INFO" name="reactor.netty.http.server.AccessLog">
        <appender-ref ref="async"/>
    </logger>

    <!-- root logger -->
    <root level="INFO">
        <appender-ref ref="CONSOLE" />
        <appender-ref ref="FILE" />
    </root>

</configuration>
Metrics Configuration
Alfred Edge can collect a lot of measurement values (aka metrics) and publish them.
By default these metrics are available via the
- actuator/metrics endpoint
- JMX Bean viewer
- via a Graphite agent, displayable via a Grafana UI
If needed, other metrics registry systems can be added on the classpath, to allow other metrics systems. The complete list can be found on Spring metrics.
General Setup
The default setup for the metrics is one central Grafana stack, containing
- a Carbon database to persist the metrics info,
- a Graphite api,
- a Grafana webserver for the User Interface.
Different Alfred Edge applications can send their data to this central Grafana system.
Sampled Metrics
By default Alfred Edge, being a Spring Boot application, will sample a lot of metrics on
- the system: cpu load, cpu count, …
- the process: uptime, …
- the Java Virtual Machine: memory, garbage collection, threads, …
- the routing, via the spring cloud gateway
Internally the metrics have a name and are tagged with some values. When exposed the names and tags are combined to give an unique name to the value.
Metrics Configuration in Alfred Edge
Via Grafana UI
In order to make Alfred Edge send the metrics to a graphite agent, like the Carbon database, following settings can be defined in the Edge configuration file (edge.yml)
management.metrics.export:
      graphite:
        host: carbon
        port: 2004
        enabled: true
        step: 10s
        tagsAsPrefix: host,app
These properties are set:
- host: the host computer where the graphite agent is running, e.g. the host with the Carbon database
- port: port number where the graphite agent accepts the batches with values (in the pickle format)
- enabled: set
trueto make Edge send the information, default value isfalse - step: the step (period) that the information is sent (10s = 10
seconds, use
sfor seconds,mfor minutes). The value of the step must be equal to the step set in the graphite agent, to avoid null values in the Grafana graphs and tables - tagsAsPrefix: specify the tags that are put in front of the metrics
names. Use
hostandapp, to make sure that all metrics names in Grafana start with the application name (specified by the propertyspring.application.name) and the name of the host edge is running on. This introduces extra dimensions to enable displaying information of one specific Edge instance or to group them together.
More information on how to configure these Grafana dashboards follows in a following chapter.
Via JMX
No specific setup is needed in Edge.
If the Micrometer JMX Registry artifact is on the classpath, the metrics
are visible in the bean metrics via a JMX Client (e.g. Java Mission
Control) that can access the Edge application.

Via Actuator Metrics Endpoint
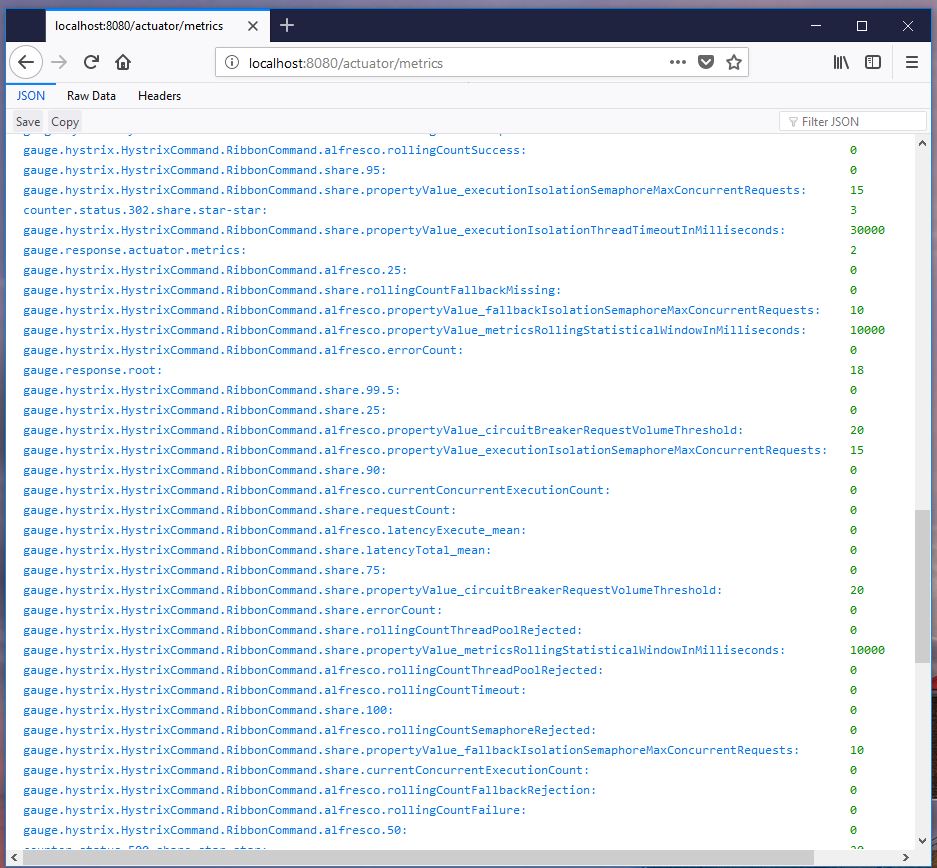
No specific setup is needed in Edge.
The information is available via the /actuator/metrics endpoint for
users having the ACTUATOR role.
Grafana Dashboards
With the Grafana UI one can define dashboards to visualize the metrics. Detailed information is found on Grafana Documentation
Simple Count or Process-time Graph
Interesting metrics to display are the number of requests processed by Edge.
The most easy graph to add can display the count of successful requests (status 200) to one origin server:
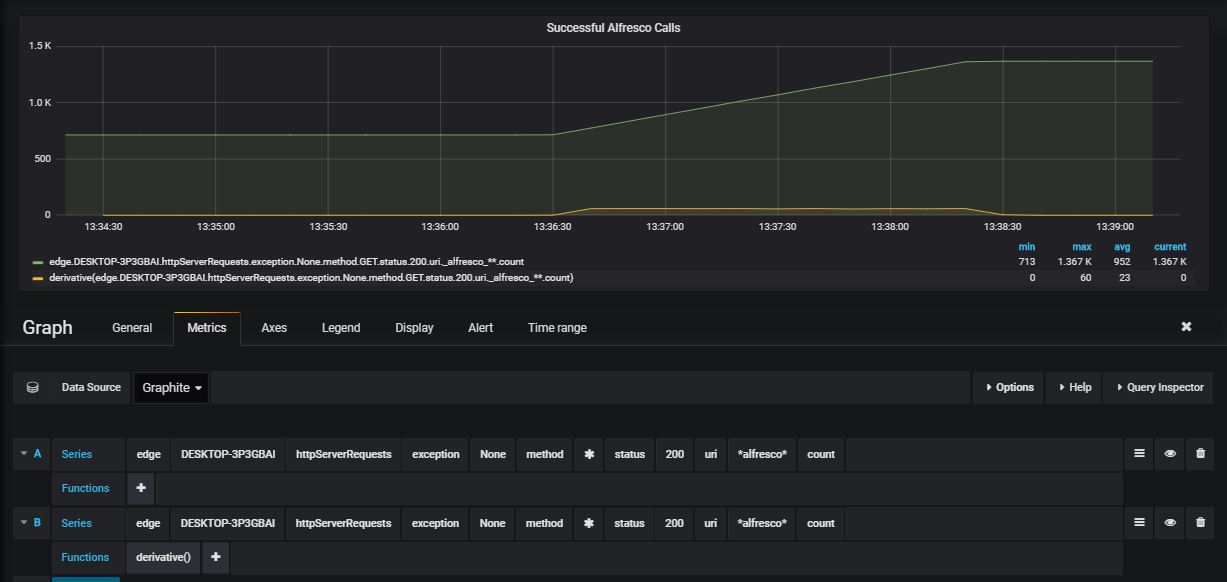
To select the metric, define such a query, via the query bar.
edge: the application name- xxx : the host Edge is running on
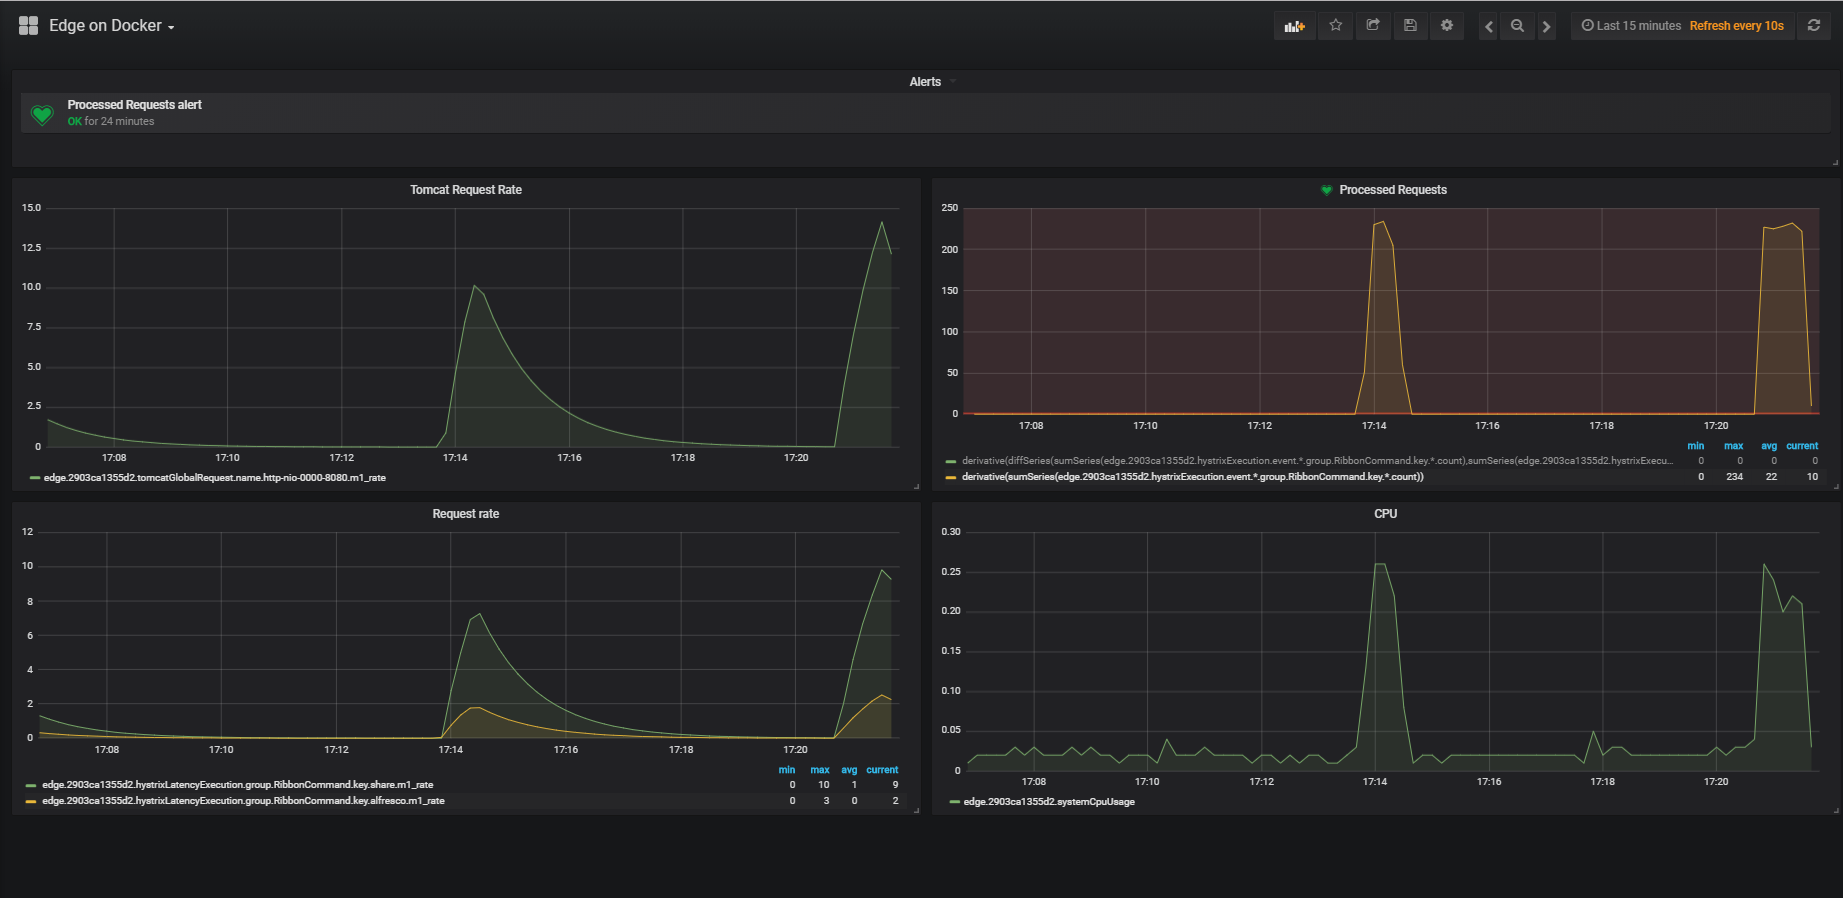
httpServerRequests: name of the metricexception- None : select the counts where no exception is thrown
method*: select all http methods (get, post, …)status- 200 : only status 200 calls
uri*alfresco*: all calls with alfresco in the uricount: name of the metric (gives the exact number of requests matching the criteria: it is an incrementing value, reset to zero when the application is restarted.
As shown in the above image, a second line is added in the graph, with
the same metric, but with the function derivative() applied on it.
This line gives the difference between two consecutive values of the
count and is a better representation of the load of the system.
It is also possible to use other metrics instead of count
m1_rate: the rate of requests per second, calculated for the last minutem5_rate: the rate of requests per second, calculated for the last 5 minutesm15_rate: the rate of requests per second, calculated for the last 15 minutes
For these requests it is also possible to plot the time to process the
requests. Instead of count, use the following metrics:
min: the minimum processing timemax: the maximum processing timepxx: the percentiles for xx being 50, 75, 95, 98, 99 and 999
Some other statistical values are available.
Combined Graphs
It is possible in Grafana to combine different measures.
E.g. count the number of requests with a return code in the range 400 to 499 (same applies to 300-399 or 500-599 for the different status ranges)
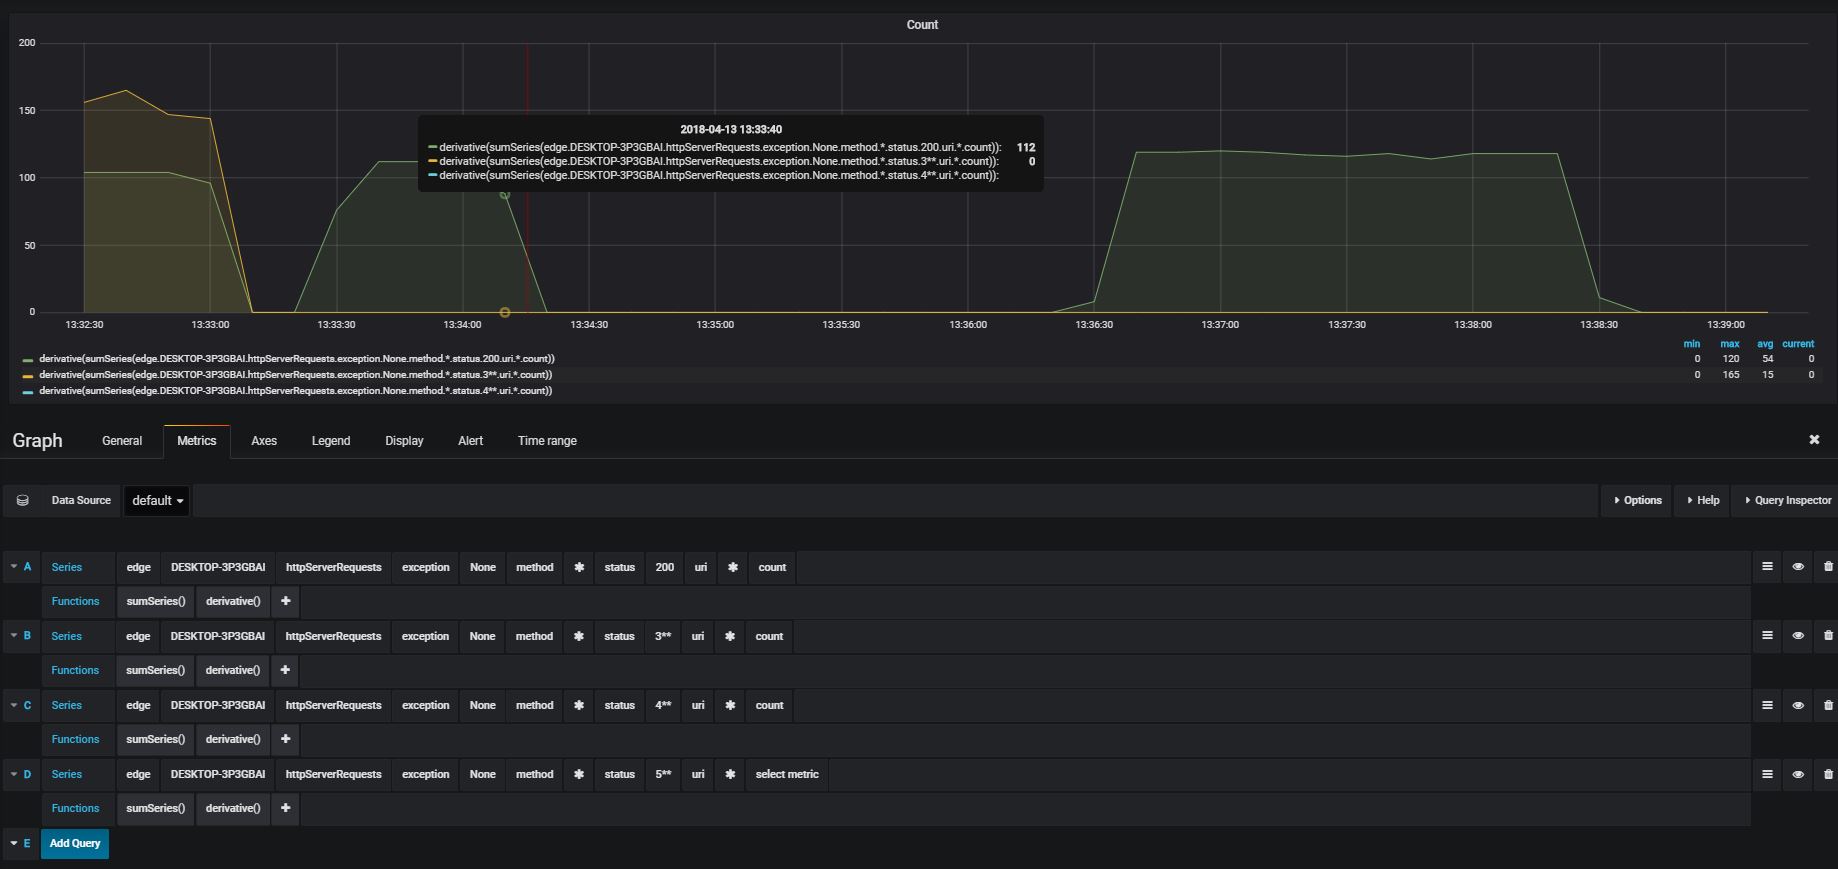
To create the query, select:
edge: the app- xxx : the host edge is running on
httpServerRequests: name of the metricexception- None : select the counts where no exception is thrown
method*: select all http methods (get, post, …)status- 4** : only status calls returning an error status between 400 and 499
uri*: all callscount: name of the metric (gives the exact number of requests matching the criteria), which increment until the service is restarted
Apply the function sumSeries() on it and all counts are added to one
value and displayed as the increasing number of errors.
Or apply the functions sumSeries() and derivative() on it to display
the total number of errors for the last sample.
By adding alerts on the last values with derivative() having a value
greater than 0, will alert when errors occur.