Managing Alfred Inflow
Managing jobs
The import of the files and their associated metadata is organized in
jobs, which can be scheduled or executed manually.
On the main page, there is an overview of all jobs that are configured.

For each job the dashboard shows: * the name of the job * a summary of the previous run: time, number of documents and number of failed documents * the destination name * the current status
Adding a job
To add a job, click on the button in the top left corner of the job table. You will be redirected to a form that lets you configure the new job.

An overview of all configurable settings is available in the job configuration section.
Editing a job
To edit a job, click on the pencil icon on the left of the job. The same form for creating a job will appear and all the settings can be updated.
Deleting a job
To delete a job, click on the pencil icon on the left of the job. In the edit job window, scroll to the bottom and click the delete button.
Running a job
To run a job manually, click on the RUN button on the right. After
refreshing the page, the status of the job will change to Running. The
RUN button will change in a STOP button that can be used to stop the
execution of the job.

Job configuration
When creating or editing a job in Inflow, the configuration defines the behavior of the job. What follows is a thorough description of each configuration parameter per configuration section.
General
Here a name and description can be specified for the job. The name is a mandatory unique identifier for the job and will also be visible in the main Inflow dashboard. The description is optional and can be used to specify a more thorough description of the job, and it’s purpose.
Input source
Inflow currently supports two input sources: the default “File system” and the “Alfresco Solr Api” source. The latter is available to support advanced Alfresco migration scenarios and should in general not be used.
File system

If the default File system source is specified, Inflow will scan the
directories specified by Input paths. If the jobs starts, files in
these directories will be processed by Inflow. The Extension filter
can be used to limit the files Inflow will pick up for processing to one
or more extensions.
Note: Directories are scanned recursively. Hence, Inflow will process all files in the specified directories and all subdirectories. Therefore, the directory to which successful or failed files are moved should never be a subfolder of the input directory since this will result in unexpected behavior.
Alfresco Solr Api
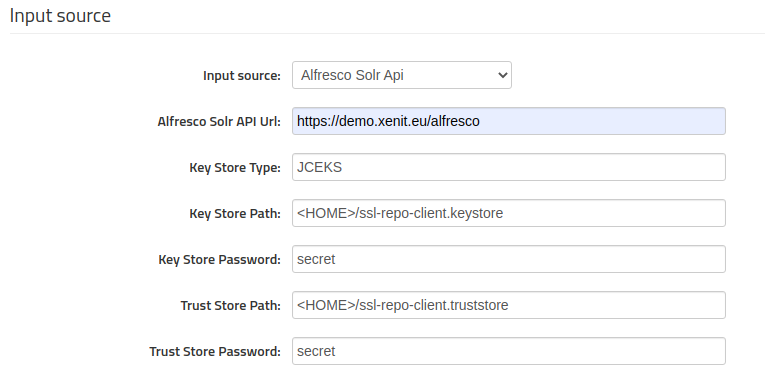
This source can be used to directly read from Alfresco as input source. More information covering this specific scenario can be found in the dedicated documentation.
Import

Destination server, specifies the Alfresco server to which files should be uploaded. For more information on how to create and manage destinations, see the Managing destinations section.Destination pathindicates the Alfresco root folder in which files should be uploaded.
Schedules

This setting can be used to trigger a job periodically or on a given point in time. Any cron job expression can be se to trigger a job run. Cron expressions can be easily generated with some handy tools.
Note: Schedules added here will only be persisted when the job is saved (via the “Save” button).
Processing

These settings define how Inflow processes input files and how they will
be uploaded to Alfresco. The Metadata processor or Parser is the
central processing component and can be custom-made. Instructions on how
to create custom metadata processors can be found in the developer
guide.
Command before
The command specified in this box, will be triggered before the job starts processing documents. You can use this to run scripts etc.Metadata processor
a.k.a.parser. Specify which metadata processor or parser will be used to for this job. Xenit provides some out of the box metadata processors, but mostly custom processors are used. The following parsers are available out of the box:- CsvMetadataLoader
- EmptyMetadataAction
- FileSystemMetadataAction
Metadata parameters
A set of metadata that will be attached to all documents uploaded in this job. Which parameters are available is specific for each metadata processor.
Options

Options can be divided in two categories: options that are bound to the
specified Mode and options that are always applicable.
Following options are always applicable:
Allow residual properties
A residual property is a property that is not part of any metadata model registered in Alfresco. By default, Alfresco does not allow creating documents with residual properties. However, with this setting, it is possible overwrite this default and force successful creation of documents with residual properties.Enable packaging documents
If enabled, Alfred Inflow packages documents to upload them in one transaction. If one document of the package fails, the entire package fails. For one document that goes in the metadata processor, all the documents the parser emits will be packaged.Move before processing to path
Path where files should be moved, before starting to process the document.Move loaded files to path
If filled in, files that are successfully uploaded to Alfresco, will be moved to this folder.Move not loaded files to path
If filled in, files that failed uploading to Alfresco, will be moved to this folder.Move unprocessed files to path
Files that are not uploaded to Alfresco but keep behind the upload folder (e.g. files that provide metadata), can also be moved to a directory with this setting.
Note: this will not have effect on the files that are moved within the parser.
Apart from these options, Inflow supports different modes and has options based on the specified mode.
Write
This is the default mode and simply means Inflow will create the document if it does not yet exist in Alfresco. If the document does already exist in Alfresco, the behavior depends on the configuration:
Log error
The uploaded document will be marked failed and an error is reported.Log error if document in Alfresco differs
The uploaded document will be compared with the document that already exists in Alfresco. If both have the same content and metadata, the upload will succeed. If both have different content or metadata, the upload will fail.Overwrite document: append metadata to existing document
The metadata and content of the uploaded document will be appended to the existing document. The difference with the “Replace” options is that no properties or aspects will be deleted.Replace metadata of existing document
The metadata and the content of the existing document will be completely replaced with the content and metadata of the uploaded document.
In the general use case, Inflow will match uploaded documents with existing documents based on the path. If a document with the specified name already exists in the specified folder, this document is used as “existing document”.
In some more advanced scenarios, other matching mechanisms can be used. Have a look at theNodeLocatorServicesection of the developer guide as an example of such a different mechanism.
Delete
Inflow also supports delete functionality. If the uploaded document can be matched to a document already existing in Alfresco, it will be deleted. What happens if the document was not found, depends on the configuration:
Log error
The upload fails and an error will be available in the report.Skip silently
No error will be reported and the upload succeeds, even though no document has been deleted.
List
The list mode can be used to check if a set of documents does or does not exist in the Alfresco repository. If the document does not exist, an error is logged. If the document does exist, the uploaded document will be compared with the document that already exists in Alfresco. If both have the same content and metadata, the upload will succeed. If both have different content or metadata, the upload will fail.
Error reporting

Send notification e-mails on error to
If enabled, will send notifications to the provided e-mail addresses on error.Relaxed unprocessed reporting
If checked, no error report mails will be sent out when only new unprocessed files and no errors are encountered. However, if an unprocessed file also occurred in a previous cycle, a report will be sent.Send load reporting e-mails to
If checked, will send load reports to the provided e-mail addresses.
Managing destinations
Destinations are Alfresco repositories. In order to move documents from
a filesystem into an Alfresco repository, first the user has to define
the destination.
The destination overview page lists all created destinations.

Create a destination
To create a new destination, click the AlfrescoHttp button.
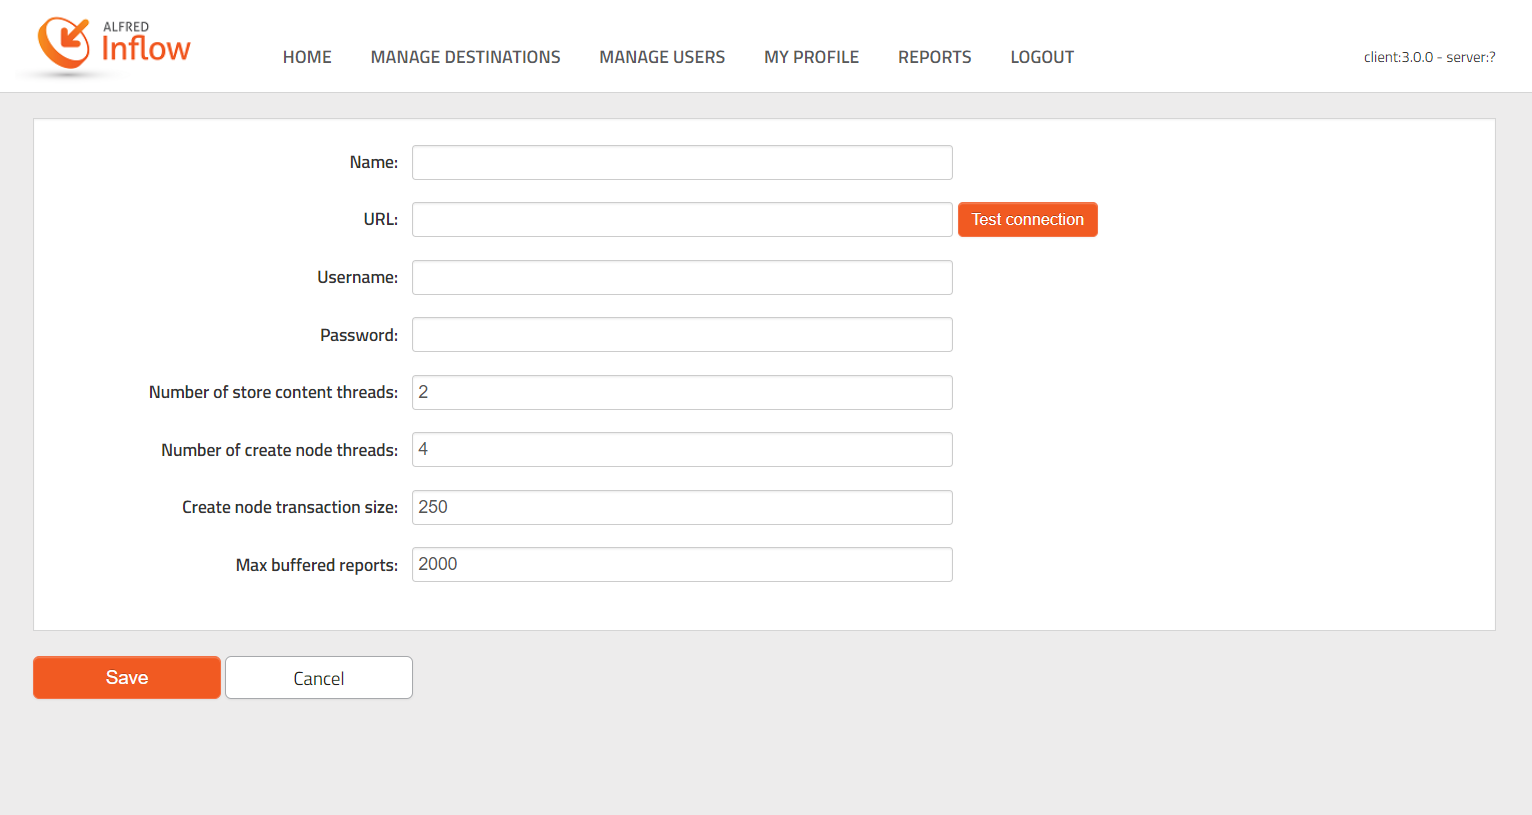
Explanation of the parameters:
Name
The name of the destination, this can be whatever you want. This is only used to specify the destination in the job form.URL
The URL to the Alfresco destination. Has to be of format:{{scheme}}://{{host}}:{{port}}/alfresco/serviceor{{scheme}}://{{host}}:{{port}}/alfresco/s. Note that there should be no ending backslash.Username
The username of the account that we want to use to upload the documents.Password
The password of the account that we want to use to upload the documents.Number of store content threads
On the Alfred Inflow backend, the first thing we do is storing the content to Alfresco. This number indicates how many threads we will be used to upload content.Number of create node threads
After storing the content, the backend will try to create the node for the document. This number indicates how many threads will be used to create the nodes.Create node transaction size
This number indicates how many packages will be stored in a single transaction. E.g. 250 means that the Inflow backend tries to upload 250 packages of documents in a single transaction. Nevertheless, if the transaction fails, all packages will be retried individually.
Be careful: The more threads that are used, the heavier this will be on the processor. A balance must be found between upload speed and processing power.Max buffered reportsIf a document is created, a report will be buffered in the backend to send back to the client. This number indicates how manny reports may be buffered maximally in the Alfred Inflow backend.
Managing users
The users’ page gives an overview of all created users.

A user account identifies who can use the Alfred Inflow application.
To create a user, click on the icon in the top left corner of the
table.
To edit a user, click on the pencil on the left of the column of that
user.
To delete a user, click on the bin icon on the right of the column of
that user.
User roles
Assign a role to the user account to specify the tasks the user is allowed to perform.
The following table summarizes the roles with their associated tasks. Every role also has access to all the tasks of lower roles.
| Role | Explanation | Task |
|---|---|---|
System admin |
A system admin has access to all aspects of the application. | View users |
| Add user | ||
| Delete user | ||
| Change user’s password | ||
Job admin |
A job admin defines jobs. | Create job |
| Edit job | ||
| Delete job | ||
Schedule admin |
A schedule admin decides when jobs have to run. | Add schedule to job |
| Delete schedule | ||
| Edit schedule | ||
| Run job on demand | ||
Consumer |
A consumer views job reports. | View (running) jobs/schedules |
| View report | ||
| Export report | ||
| Change own password |
Depending on the role of the user the web interface will contain a subset of the available tabs.